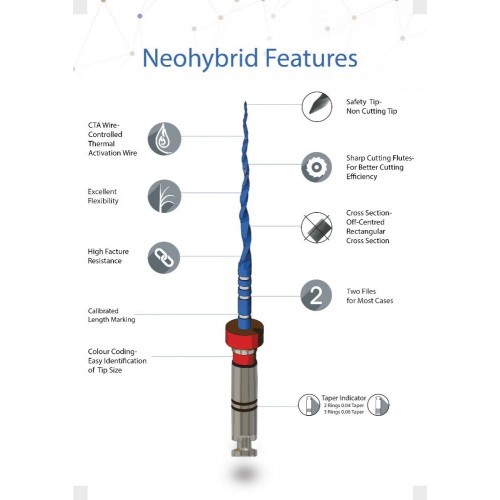
- Fracture resistant
- Easy to follow
- Extremely flexible
HyFlex™ Controlled Memory NiTi Files have been manufactured utilizing a unique process that controls the material’s memory.
FEATURES:
- The files are extremely flexible but without the shape memory of conventional NiTi Files.
- This gives the file the ability to follow the anatomy of the canal very closely, reducing the risk of ledging, transportation or perforation.
- Furthermore the files can be pre-bent, similar to the way of stainless steel.
- Particularly in root canals with abrupt curvatures this can help avoid the creation of steps.
- Regains shape after heat treatment = Multi-use
- HyFlex™ CM NiTi files respond to excessive resistance with straightening of the spirals, which avoids binding to the walls and therefore increases fracture resistance.
- This form adaptation can be reversed quickly by heat treatment (during autoclaving or with a glass bead sterilizer) returning the instruments back to their original shape.
- Furthermore it will strengthen the files making them a lot more resistant to cyclical fatigue.
- Also it provides a clear visual opportunity to verify safe continuation of file use.
4 file
Instructions:
A new file should be used for each procedure to reduce the risk of file separation.
- Sterilize files prior to use. See sterilization instructions below.
- Use of a slow speed hand piece required. Operate the hand piece at 300 RPM (revolu- tions per minute). Recommended torque setting up to 2.5 N·cm (25 mN·m).
- Irrigate during and between each step. COLTENE® ENDO recommends the use of CanalPro™ EXTRA for irrigation and debridement.
- Clean file flutes after each insertion into the root canal.
- Recapitulate between each step.
Files may be used with Crown-down and Step-back techniques, or with the Hybrid technique below. In curved canals, use of a HyFlex® CM™ (Controlled Memory) is recommended for preparing the apical curvature.
Step by Step instructions:
Coronal Patency: After gaining a Straight-Line coronal access, create an apical glide path using HyFlex® GPF™ system or a 02/20 hand file size.
STEP 1 - Start with the 08/25 file. Use as an orifice opener. Move slowly forward without pressure in a pecking motion. Once resistance occurs go to step 2. Check patency with 02/20 hand file, irrigate and lubricate. Optional Step: If working length is reached in large canals it may be possible to go directly to step 4.
STEP 2 - Use the 04/20 file for apical enlargement to the Working Length. Move slowly forward without pressure in a pecking motion. In case resistance occurs use a 02/20 hand file to check patency. Irrigate and lubricate.
STEP 3 - Insert 04/25 file for apical enlargement to the Working Length. Move slowly forward without pressure in a pecking motion. If resistance occurs, go back to the previous step. Use a 02/20 hand file to check patency. Irrigate and lubricate.
STEP 4 - Use the 06/20 file to shape middle part of the root canal. This file can also be taken to Working Length. Move slowly forward without pressure in a pecking motion. If resistance occurs, go back to the previous step. Use a 02/20 hand file to check patency. Irrigate and lubricate.
STEP 5 - Take 04/30 file to Working Length to enlarge the apical part of the canal. Move slowly forward without pressure in a pecking motion. If resistance occurs, go back to the previous step. Use a 02/20 hand file to check patency. Irrigate and lubricate.
STEP 6 - Finish treatment with 04/40 file to Working Length. Move slowly forward without pressure in a pecking motion. If resistance occurs, go back to the previous step. Use a 02/20 hand file to check patency. Irrigate and lubricate.
Cleaning Instructions:
- Soak all instruments immediately after use in a detergent and disinfecting solution combined with proteolytic enzyme if possible.
- In case of having debris left on the file, use a soft toothbrush for cleaning.
- Follow instructions below under “Sterilization Instructions”.
Related Products

Latest Blogs
Coltene, over the years since its establishment, has emerged as one of the leading manufac...
Read MoreGood oral health plays an important role in our lives. It has several life-changing advant...
Read MoreGood oral health and hygiene have plentiful benefits. It not just earns you an attractive...
Read MoreDental braces are dental devices that orthodontists use to reposition and straighten your...
Read MoreDental bonding also known as teeth bonding is a cosmetic procedure done to repair chips, c...
Read MoreWith the growth of the dental industry, it is essential to try and find out which are the...
Read MoreWhen it comes to delivering high-quality dental care, the Coltene Rubber Dam Kit stands ou...
Read MoreIn restorative dentistry, composite materials play a vital role in delivering functional a...
Read MoreAs a trusted supplier, ID Enterprises offers top-quality NeoEndo rotary files designed to...
Read More