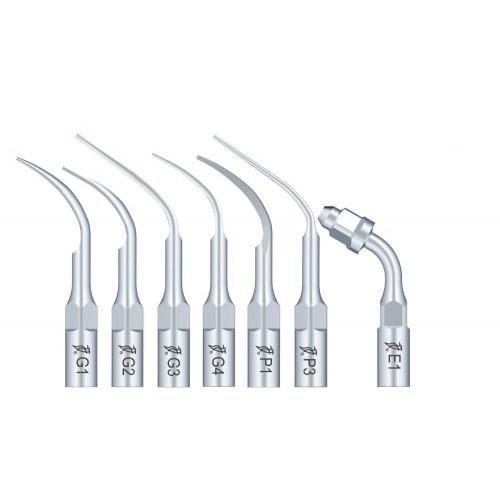
- 24 different tip shapes available
- Compatible with all BioSonic Piezo Scalers as well as competitive models
- Two Thread-Styles
- S-Series = Satelec Thread Style
- E-Series = EMS Thread Style
- Digitally Controlled.
- Automatic Frequency Tracking.
- Extremely Durable .
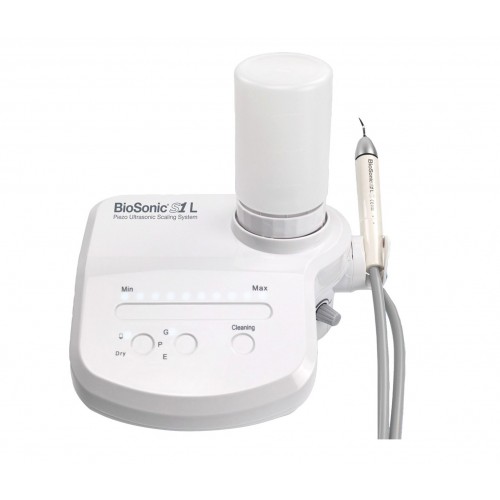
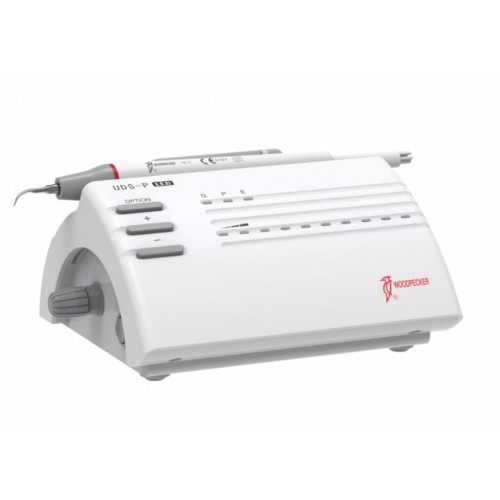
BioSonic Piezo Ultrasonic Scaler System
- Digitally controlled, automatic frequency tracking ensures unit will consistently work at the best frequency
- Re-usable metal filter traps debris from entering unit, allowing efficient water flow
- Handpiece is made from titanium alloy, making it extremely durable and autoclavable
- Three Pre-Set Options: General Scaling, Periodontal and Endodontic procedures
- Ten unique power settings
BioSonic Piezo Inserts
4 tip categories:
- General Scaling Tips
- Peridontic Tips
- Endodontic Tips
- Cavity Preparation Tips
- 1 x BioSonic S1 Piezo Ultrasonic Scaling System Unit
- 1 x USS1S Tip
- 1 x USS2S Tip
- 1 - USS4S Tip
- 1 x USP1S Tip
- 1 x USE1E Tip
BioSonic® S1 Piezo Ultrasonic Scaler
CAUTION: Federal law restricts this device to sale by, or on the order of, a licensed healthcare practitioner.
An essential part of your periodontal and prophylaxis therapy, as well as, root canal treatment.
Congratulations on your purchase of a Coltène/Whaledent BioSonic® S1 Piezo Ultrasonic Scaler. Developed specifically for use by dental hygienists, dentists, periodontists, and endodontists, Coltène/Whaledent’s Biosonic® S1 Piezo Ultrasonic Scaler (here-in- after referred to in this manual as the “unit”) is uniquely designed to save time by being a multi-functional device for general scaling as well as perio and endo dental procedures.
What is scaling?
Scaling is the process by which calculus is removed from the tooth surface. This can be accomplished using either hand instruments (such as hand scalers or curettes) or ultrasonic scalers. When using ultrasonic scalers, high frequency waves generated within the ultrasonic handpiece cause the tip to vibrate at 28,000 cycles per second. This vibration removes calculus from tooth surfaces more rapidly and effectively than hand instruments, while also eliminating unhealthy biofilm.
Piezo Ultrasonic Applications
- Dental Calculus Elimination
- Periodontal Therapy
- Root Canal Treatment
- Unpacking
- Remove the unit from the shipping carton and inspect it for any damage which may have occurred during shipping.
- Make sure all parts and accessories have been included according to the packaging list in Section VII.
- Check the serial number on the underside of the unit against the number on the shipping carton. If these numbers are not the same, contact your dealer.
- Complete the warranty card and mail to Coltène/Whaledent within 10 days of receipt.
- Position the unit for easy access during patient treatment and
also near a wall receptacle and cold water line. Make sure that the unit is placed on a flat surface, such as a countertop.
- Set Up
A. Water (H2O) Line Connection
- Incoming cold water supply line pressure to the unit must be a maximum of 50 PSI (0.01-0.50 MPa).
- The cold water line should be thoroughly flushed prior to connection of the unit
- Turn the Water Control Knob to the maximum position at the back of the unit
- Connect the cold water supply line to the back of the unit and tighten with the connector
- Fasten the other end to the cold water supply line using the metal quick-connector.
- Inspect all connections to make certain there are no leaks.
B. Power Cord/Foot Switch
- Plug the proper end of the Power Cord into the Power Supply Socket located at the back of the unit
- Insert the grounded plug supplied with the unit into a properly grounded electric receptacle, preferably “Hospital Grade.”
- Insert the Foot Switch cable into its designated socket at the back of the unit
- Place the Foot Switch in a convenient place on the floor.
- Turn on the unit using the ON/OFF Power Switch located at the back of the unit. The General indicator (G) and the number 5 power level will light up.
C. Handpiece Connection and Components
- Attach the Handpiece to the Connector Cable
- Be sure to keep the Connector Cable and Handpiece interface dry when connecting.
Components:
Nipple: The Nipple can be removed by unscrewing it from the Handpiece. The shaft can be cleaned with isopropyl alcohol.
Handpiece: The Handpiece is the main component and can be autoclaved to 132°C.
Connector Cable: Connects the Handpiece to the water source
and power supply of the unit.
- Operating Instructions
A. Patient preparation and positioning
- Have the patient perform an antimicrobial pre-procedural mouth-rinse for up to 60 seconds to reduce bacterial contamination of the aerosol.
- Place the dental chair in a supine position for optimal access to both the maxillary and mandibular arches. This improves patient comfort and increases clinician visibility.
- Position the patient’s head for optimum access to the quadrant and tooth surface being treated. Evacuate water and debris with a saliva ejector or high volume evacuator.
Related Products
Latest Blogs
Coltene, over the years since its establishment, has emerged as one of the leading manufac...
Read MoreGood oral health plays an important role in our lives. It has several life-changing advant...
Read MoreGood oral health and hygiene have plentiful benefits. It not just earns you an attractive...
Read MoreDental braces are dental devices that orthodontists use to reposition and straighten your...
Read MoreDental bonding also known as teeth bonding is a cosmetic procedure done to repair chips, c...
Read MoreWith the growth of the dental industry, it is essential to try and find out which are the...
Read MoreWhen it comes to delivering high-quality dental care, the Coltene Rubber Dam Kit stands ou...
Read MoreIn restorative dentistry, composite materials play a vital role in delivering functional a...
Read MoreAs a trusted supplier, ID Enterprises offers top-quality NeoEndo rotary files designed to...
Read More